Customize SAP Build Workzone Side Menu Icons by use of a Shell Plugin
Originally published on SAP Community , 1 January 2026.
Introduction
SAP Build Work Zone serves as a central entry point for business users with personalized, role-based access to SAP and third-party applications. With customers wanting to customize its look and feel, adding custom buttons and custom visual representation of navigation items, this blog posts aims at showing how to achieve this customization by the use of Shell Plugins.
1. What you will learn in this blogpost
You will learn how to spin up a workzone subscription, and customize the workzone shell by use of a shell plugin. This will help you to customize the layout, add action buttons and also change icons on the side menu of the workzone.
2. What Shell Plugins do
With the standard configuration, the outer shell of the workzone is limited and customers want to extend the functionality, adding buttons to the shell or even changing its look and feel. This can be achieved by the use of a Shell Plugin.
3. First steps
To follow this blog post you need to complete the following prerequisites:
-
Have a SAP BTP subaccount or a SAP BTP Trial Account
-
Have a SAP Build Workzone Standard Edition Subscription (this is important as the advanced edition does not yet allow to display the menu on the side)
-
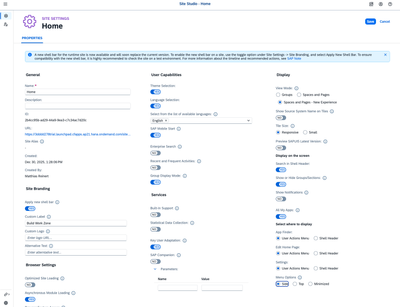
Configure your site with the following attributes (important is to set the menu option to “side” - this option only appears if the view mode is set to “Spaces and Pages”)
-
Have a SAP Business Application Studio subscription or VSCode installed with the CF CLI, MBT tools
-
Know how to create subscriptions
-
Know to assign role collections to your user
-
Have a Space, a Page and an App set up in the workzone and assigned to the role “Everyone”
4. Shortcut with Terraform and Github
I have created a GitHub repo which helps you to spin up the resources in your trial account and deploy the Shell Plugin via CF CLI. If you are familiar with terraform or even have an own terraform repo managing you BTP, this can save you some click-ops activity in the BTP Cockpit. I will provide a detailed walk-through on how to use terraform in BTP in a separate post, the main focus of this blog post is to customize the workzone shell.
5. Setup on SAP BTP
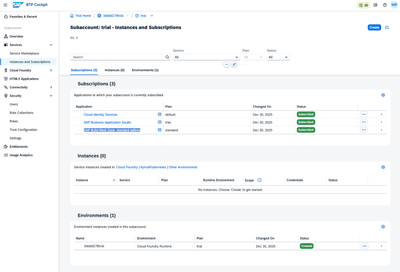
All the instructions on how to deploy this module is stated in the README file on GitHub, please be careful with deploying via terraform if you are not familiar with it.
For developers deploying to an already configured subaccount, be careful not to override existing configuration.
6. Setup on SAP BAS / VSCode
-
Make use of the Fiori Application Wizard (BAS has this extension already installed)
- Create Project from Temlate: Basic
- Data Source: None
- View Name: ShellPlugin
- Target: Cloud Foundry
-
Navigate to the manifest.json file in the webapp/ folder
Enrich the file with the with the following configuration
"crossNavigation": {
  "inbounds": {
    "Shell-plugin": {
      "semanticObject": "Shell",
      "action": "plugin",
      "title": "{{Shell-plugin.flpTitle}}",
      "hideLauncher": true,
      "icon": "sap-icon://pushpin-on",
      "signature": {
        "parameters": {},
        "additionalParameters": "allowed"
      }
    }
  }
}
and
"sap.flp": {
  "type": "plugin"
}- Customize the component.js file in thewebapp/ folder.
init() {
            UIComponent.prototype.init.apply(this, arguments);
            this.setModel(models.createDeviceModel(), "device");
            this.getRouter().initialize();

            this._getRenderer().then((oRenderer) => {
                oRenderer.addHeaderEndItem({
                    icon: "sap-icon://add",
                    tooltip: "Add bookmark",
                    press: () => {
                        const oDialog = new Dialog({
                            title: "What's new",
                            content: new Text({ text: "Hello from shell plugin!" }),
                            beginButton: new Button({
                                text: "OK",
                                press: () => oDialog.close()
                            }),
                            afterClose: () => oDialog.destroy()
                        });
                        oDialog.open();
                    }
                }, true, false);
                this._updateNavIcons();
            });
        },

        _getRenderer() {
            var oRenderer = sap.ushell.Container.getRenderer("fiori2");
            return (oRenderer && typeof oRenderer.then === "function") ? oRenderer : Promise.resolve(oRenderer);
        },

        _getNavList() {
            try {
                const oNavList = sap.ui.getCore().byId("__list0"); // your NavigationList ID
                if (!oNavList) {
                    console.warn("NavigationList control not found");
                    return null;
                }
                return oNavList.getItems ? oNavList.getItems() : [];
            } catch (err) {
                console.error("Error retrieving NavigationList items", err);
                return null;
            }
        },

        _updateNavIcons() {
            const aItems = this._getNavList();
            if (!aItems) return;

            const _updateItem = (oItem) => {

                const sText = oItem.getText();
                switch (sText) {
                    case "Cool Space":
                        oItem.setIcon("sap-icon://customer-and-contacts"); break;
                    default:
                        oItem.setIcon("sap-icon://document"); break;
                }

                console.log(`Updated icon for "${sText}" to "${oItem.getIcon()}"`);

                if (oItem.getItems && oItem.getItems().length > 0) {
                    oItem.getItems().forEach(_updateItem);
                }
            };

            aItems.forEach(_updateItem);
        }
Also add the following to your sap.ui.define function:
sap.ui.define([
    "sap/ui/core/UIComponent",
    "mrt/shellplugin/model/models",
    "sap/m/Dialog",
    "sap/m/Button",
    "sap/m/Text"
], (UIComponent, models, Dialog, Button, Text) =>
7. Deploy the Shell Plugin
- Right click on the mta.yaml file
- Click on Build MTA Project
- Expand the mta_archives folder and right click on the mtar file, click Deploy MTA file
- Signin to Cloud Foundry and deploy the application
8. Verify Deployment on BTP
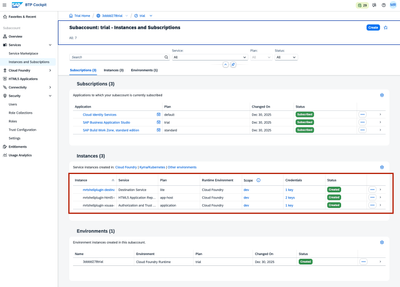
In the cockpit you should now see the instances created
9. Setup of the Shell Plugin in SAP Build Workzone
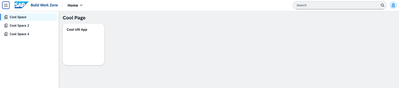
The inital configuration of the Shell only displays the standard navigation Icon on the space. Our goal is to change this icon for a better visual representation of the navigation items. This helps the end user to distinguish between different customer created spaces, especially if the menu is collapsed.
This is our goal:
Inital navigation tree:
Then
After the Plugin:

to achieve this,
-
Navigate to the Content Manager in the workzone
-
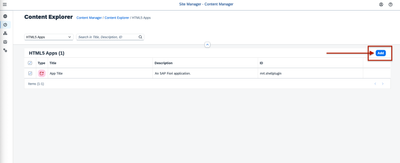
Go to the Content Channel and refresh the content of the HTML5 Apps
-
Click on the content explorer button
-
You will now see your shell plugin, select it and click on add
-
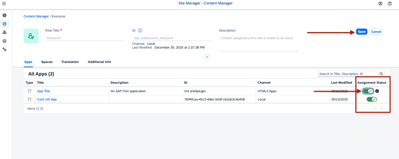
Navigate back to the Content Manager and Overview, navigate to the Role “Everyone” and assign the shell Plugin to the role in the “Apps” section, this will make the plugin available for everyone accessing the workzone
-
Navigate to the Site Directory and launch the Home Website
-
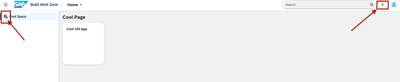
The icon has changed in the DOM-Tree to the icon specified in the component.js
-
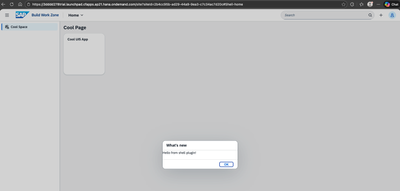
Pressing on the custom button in the top bar will reveal the Dialog box specified in the newly created event handler of the Shell Plugin
10. Final thoughts and improvements
You have learned how to customize the shell of your SAP Build Workzone. When you change icons in the navigation tree, you can use the switch statement on the navigation item’s name, but a better way would be to use the index property itself. This way the DOM manipulation in the frontend remain stable and unaffected by language translations.