Rendering tree tables in SAP BTP ABAP Environment
Originally published on SAP Community , 15 February 2024.
Since the end of last year, it has been possible to implement hierarchies in SAP BTP ABAP Environment. The feature is fairly easy to implement once you’ve seen it done once, so here is an end-to-end guide on how to build a tree table on ABAP Environment.
Step 1: Create an ABAP package
Create an ABAP package with a name of your choice.
Step 2: Create a database table
@EndUserText.label : 'Employee Data'
@AbapCatalog.enhancement.category : #NOT_EXTENSIBLE
@AbapCatalog.tableCategory : #TRANSPARENT
@AbapCatalog.deliveryClass : #A
@AbapCatalog.dataMaintenance : #RESTRICTED
define table zmriemployee {

  key employee_id : abap.char(20) not null;
  first_name      : abap.sstring(255);
  last_name       : abap.sstring(255);
  salary          : abap.dec(8,2);
  salary_currency : abap.cuky;
  manager         : abap.char(20);

}
Step 3: Create an ABAP class and fill the table with demo data
Add the if_oo_adt_classrun interface to your class so you can execute it
directly from ADT.
CLASS z_fill_employee_data DEFINITION
  PUBLIC
  FINAL
  CREATE PUBLIC .

  PUBLIC SECTION.

    INTERFACES if_oo_adt_classrun .

    DATA:
        lt_employees TYPE TABLE OF zmriemployee.

  PROTECTED SECTION.
  PRIVATE SECTION.
ENDCLASS.


CLASS z_fill_employee_data IMPLEMENTATION.

  METHOD if_oo_adt_classrun~main.

    APPEND VALUE #(
      employee_id = '00000001'
      first_name = 'John'
      last_name = 'Travolta'
      salary = '100000.99'
      salary_currency = 'CHF'
    ) TO lt_employees.

    APPEND VALUE #(
      employee_id = '00000002'
      first_name = 'Will'
      last_name = 'Smith'
      salary = '80000.99'
      salary_currency = 'USD'
      manager = '00000001' ) TO lt_employees.

    APPEND VALUE #(
      employee_id = '00000003'
      first_name = 'Jessica'
      last_name = 'Alba'
      salary = '85000.99'
      salary_currency = 'CHF'
      manager = '00000002' ) TO lt_employees.

    APPEND VALUE #(
      employee_id = '00000004'
      first_name = 'Monica'
      last_name = 'Belucci'
      salary = '45987.99'
      salary_currency = 'EUR'
      manager = '00000002' ) TO lt_employees.

    APPEND VALUE #(
      employee_id = '00000005'
      first_name = 'Jack'
      last_name = 'Nicolson'
      salary = '80000.99'
      salary_currency = 'CHF'
      manager = '00000002' ) TO lt_employees.

    APPEND VALUE #(
      employee_id = '00000006'
      first_name = 'Cameron'
      last_name = 'Diaz'
      salary = '47856.99'
      salary_currency = 'USD'
      manager = '00000005' ) TO lt_employees.

    out->write( name = `Employee data to be inserted:` data = lt_employees ).

    DELETE FROM zmriemployee.

    INSERT zmriemployee FROM TABLE @lt_employees.

    COMMIT WORK.

    CLEAR lt_employees.

    out->write( `Insert successful` ).

  ENDMETHOD.
ENDCLASS.
The table data should look like this:

There is a relationship between the employee_id and the manager field:
where manager is empty (initial), there is no allocation to another
employee, so that person sits at the top of the hierarchy.
Step 4: Create a view entity as the interface view for employee data
When creating the data definition, choose the View Entity template, import all fields into the view (Ctrl + Space), and implement the many-to-one association to the database table.
@AbapCatalog.viewEnhancementCategory: [#NONE]
@AccessControl.authorizationCheck: #NOT_REQUIRED
@EndUserText.label: 'Interface view for employee demo data'
@Metadata.ignorePropagatedAnnotations: true
@ObjectModel.usageType:{
    serviceQuality: #X,
    sizeCategory: #S,
    dataClass: #MIXED
}
@Metadata.allowExtensions: true
define view entity Z_I_EMPLOYEE_DATA as select from zmriemployee
  association of many to one Z_I_EMPLOYEE_DATA as _Manager on $projection.Manager = _Manager.EmployeeId
{
  key employee_id as EmployeeId,
      first_name as FirstName,
      last_name as LastName,
      salary as Salary,
      salary_currency as SalaryCurrency,
      manager as Manager,

      _Manager
}
Step 5: Define the hierarchy mapping
When creating the data definition, choose the Define Parent Child Hierarchy template and define the hierarchy relationship.
@AccessControl.authorizationCheck: #NOT_REQUIRED
@EndUserText.label: 'Hierarchy: Read Only: Employee Hierarchy'

define hierarchy Z_I_EMPLOYEE_DATA_HN
  as parent child hierarchy(
    source Z_I_EMPLOYEE_DATA
    child to parent association _Manager
    start where
      Manager is initial
    siblings order by
      LastName ascending
  )
{
  key EmployeeId,
      Manager
}
Step 6: Create the consumption view
Create a data definition referencing the hierarchy entity.
@AccessControl.authorizationCheck: #NOT_REQUIRED
@EndUserText.label: 'Hierarchy: Read Only: Employee'

@Metadata.allowExtensions: true
@Search.searchable: true

@OData.hierarchy.recursiveHierarchy:[{ entity.name: 'Z_I_EMPLOYEE_DATA_HN' }]

define view entity Z_C_EMPLOYEE_DATA
  as select from Z_I_EMPLOYEE_DATA
  association of many to one Z_C_EMPLOYEE_DATA as _Manager on $projection.Manager = _Manager.EmployeeId
{
  key EmployeeId,

      @Search: {
        defaultSearchElement: true
      }
      FirstName,

      LastName,

      Salary,

      SalaryCurrency,

      Manager,

      /* Associations */
      _Manager
}
Step 7: Create a metadata extension with UI5 annotations
@Metadata.layer: #CORE
@UI: { headerInfo: {
                     typeName: 'Employee',
                     typeNamePlural: 'Employees',
                     title: { type: #STANDARD, value: 'EmployeeId' }
                   },
       presentationVariant: [{
           sortOrder: [{ by: 'EmployeeId', direction: #ASC }],
           visualizations: [{type: #AS_LINEITEM}]
         }]
     }
annotate entity Z_C_EMPLOYEE_DATA
    with
{
  @UI: {
      facet: [
        { id:       'EmployeeId',
          purpose:   #STANDARD,
          type:      #IDENTIFICATION_REFERENCE,
          label:     'EmployeeId',
          position:  10
        }
      ]
    }

  @UI: {
      lineItem:       [{ position: 20, label: 'The employee id' }],
      identification: [{ position: 20 }]
    }
  EmployeeId;

  @UI: {
      selectionField: [{ position: 30 }],
      lineItem:       [{ position: 30 }],
      identification: [{ position: 30 }]
    }
  FirstName;

  @UI: {
      selectionField: [{ position: 30 }],
      lineItem:       [{ position: 40 }],
      identification: [{ position: 40 }]
    }
  LastName;

  @UI: {
      lineItem:       [{ position: 50 }],
      identification: [{ position: 50 }]
    }
  Salary;

  @UI: {
      lineItem:       [{ position: 70 }],
      identification: [{ position: 70 }]
    }
  Manager;
}
Step 8: Create a service definition
Expose the consumption view through a service definition.
@EndUserText.label: 'Service Definition'
@ObjectModel.leadingEntity.name: 'Z_C_EMPLOYEE_DATA'
define service Z_UI_Employee_DATA {
  expose Z_C_EMPLOYEE_DATA as Employee;
}
Step 9: Create and publish the service binding
Create a service binding of binding type OData V4 - UI, then publish it.
Step 10: Preview
Click the preview button and voilà — the table renders with a tree structure.
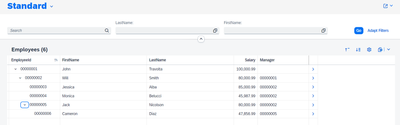
It’s important that the data type and structure of the hierarchy’s node ID
match exactly, since that field is the central component for rendering the
tree. If you run into an error when calling the Fiori frontend, use the
Eclipse debugger to trace it down. Most likely the field used for the
hierarchy association doesn’t match the expected data type, which shows up
either as an ABAP runtime error (RAISE_SHORTDUMP) or as an HTTP error
($batch failed).